AI在各行各业落地生花,实现自己的Agent已经不是多麻烦的事情了。就犹如当年的互联网+浪潮一样,AI也在和各行各业结合。这篇文章使用LangGraph实现一个简单的推理引擎。
推理/流程图的定义
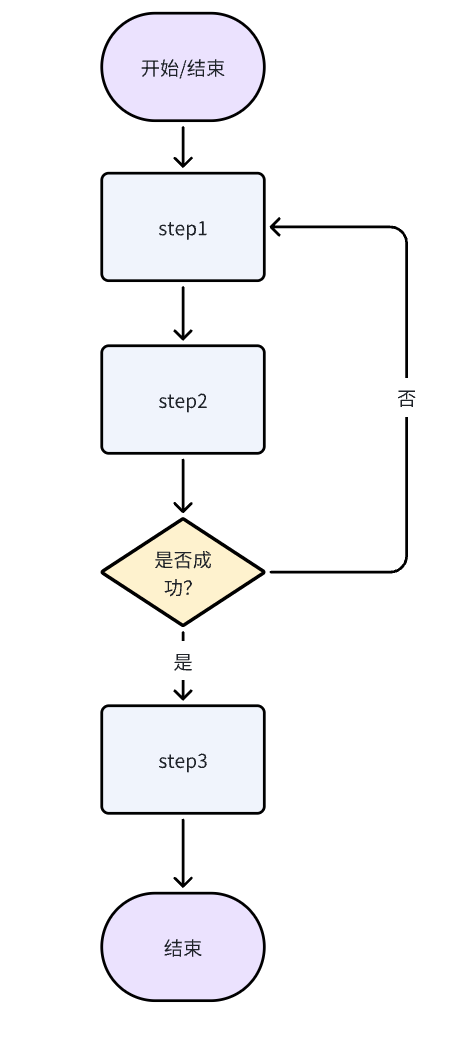
完成某个任务,我们有固定的流程,比如步骤一、步骤二...,多个步骤中,可能有分支判断,如果xxx则xxx。针对这种流程图,我们怎么统一抽象实现呢?就比如下面的流程(每个节点可对应具体的操作,如:问题澄清、数据库查询、工具类调用):
LangGraph搭建推理图
LangGraph是一个用于构建有状态、多参与者应用程序的库,特别适合实现复杂的推理流程。它提供了四个核心概念:
状态(State)
状态是整个推理引擎的数据载体,定义了节点之间传递的信息结构。
from typing import TypedDict

class State(TypedDict):
    """
    推理引擎的状态定义
    """
    step: str      # 当前执行步骤
    status: str    # 执行状态(成功/失败)
关键点:
- 使用
TypedDict定义状态结构 - 状态在节点间自动传递和更新
- 支持复杂的数据类型(字符串、数字、列表、字典等)
节点(Node)
节点是推理流程中的具体执行单元,每个节点负责完成特定的任务。
def step_1_function(state: State) -> State:
    """
    步骤1:初始化处理
    """
    print("Step 1 function")
    return {"step": "step 1", "status": ""}

def step_2_function(state: State) -> State:
    """
    步骤2:核心业务逻辑
    """
    print("Step 2 function")

    # 模拟随机失败(实际中可能是业务逻辑判断)
    status = ""
    if random.random() < 0.8:  # 80% 失败率
        status = "failed"
        print("Step 2 function failed")

    return {"step": "step 2", "status": status}

def step_3_function(state: State) -> State:
    """
    步骤3:后续处理
    """
    print("Step 3 function")
    return {"step": "step 3", "status": "success"}
设计原则:
- 每个节点只做一件事
- 输入和输出都是状态对象
- 节点间通过状态传递数据
边(Edge)
边定义了节点之间的连接关系,包括无条件边和条件边。
# 无条件边:直接连接两个节点
graph.add_edge(START, "step_1")        # 开始 → 步骤1
graph.add_edge("step_1", "step_2")     # 步骤1 → 步骤2
graph.add_edge("step_3", END)          # 步骤3 → 结束

# 条件边:根据状态决定下一步
def conditional_router(state: State) -> str:
    """
    条件路由器:根据状态决定下一步
    """
    return "step_3" if state.get("status") != "failed" else "step_1"

graph.add_conditional_edges(
    "step_2",
    conditional_router,
    {"step_1": "step_1", "step_3": "step_3"}
)

# 或者
# graph.add_conditional_edges(
#     "step_2",
#     lambda state: 'step_1' if state.get("status") == "failed" else "step_3"
# )
构建推理引擎
现在我们来看如何将这些组件组合成一个完整的推理引擎。
def build_reasoning_engine():
    """
    构建推理引擎
    """
    graph = StateGraph(State)
    # 添加节点
    graph.add_node("step_1", step_1_function)
    graph.add_node("step_2", step_2_function)
    graph.add_node("step_3", step_3_function)

    # 添加边
    graph.add_edge(START, "step_1")
    # 添加路由,如果step_2失败,则重新开始;成功则跳转到step_3
    graph.add_conditional_edges(
        "step_2",
        conditional_router,
        {"step_1": "step_1", "step_3": "step_3"}
    )

    graph.add_edge("step_1", "step_2")
    graph.add_edge("step_3", END)

    # 编译图
    app = graph.compile()
    print("推理引擎构建完成")
    return app
构建步骤说明:
- 创建图实例:
StateGraph(State)指定状态类型 - 添加节点:
add_node(name, function)注册处理函数 - 添加边:
add_edge(from, to)定义节点连接 - 添加条件边:
add_conditional_edges(node, router, mapping)实现分支逻辑 - 编译图:
compile()生成可执行的应用
调用推理引擎
构建完成后,我们就可以调用推理引擎来处理具体的任务。
def main():
    """
    主函数
    """
    app = build_reasoning_engine()
    result = app.invoke({"step": "step 0", "status": ""})
    print("执行结果:", result)

if __name__ == "__main__":
    main()
调用方式:
- 同步调用:
app.invoke(initial_state)直接返回最终结果 - 流式调用:
app.stream(initial_state)逐步返回每个节点的执行结果 - 批量调用:
app.batch([state1, state2])并行处理多个任务
流式调用详解:
流式调用是 LangGraph 的重要特性,可以实时观察推理过程的每一步执行结果。
# 流式调用示例
print("=== 流式输出演示 ===")
for chunk in app.stream({"step": "step 0", "status": ""}):
    print(f"流式结果: {chunk}")
流式输出格式:
- 每个
chunk是一个字典,键为节点名,值为该节点的输出状态 - 格式:
{节点名: {状态字段: 值}} - 例如:
{'step_1': {'step': 'step 1', 'status': ''}}
流式 vs 同步调用对比:
# 流式调用:实时观察执行过程
for chunk in app.stream(initial_state):
    print(f"当前节点: {list(chunk.keys())[0]}")
    print(f"节点状态: {list(chunk.values())[0]}")

# 同步调用:只返回最终结果
final_result = app.invoke(initial_state)
print(f"最终状态: {final_result}")
流式调用的优势:
- 实时监控:可以观察推理过程的每一步
- 调试友好:快速定位问题节点
- 进度跟踪:了解长时间运行任务的进度
- 状态检查:在关键节点进行状态验证
关于 recursion_limit(递归深度上限)
在含有回环(如失败重试)或较长链路的图中,可能遇到错误:
Recursion limit of 25 reached without hitting a stop condition.
这是 LangGraph 的安全阈值,用来避免无限循环。你可以在调用时通过 config 调整上限:
# 同步调用提升上限
final_result = app.invoke(initial_state, {"recursion_limit": 200})

# 流式调用提升上限
for chunk in app.stream(initial_state, {"recursion_limit": 200}):
    print(chunk)
建议:
- 先保证“有明确的停机条件”(如最大重试次数),再酌情提高
recursion_limit。 recursion_limit只是“阈值”,不是解决逻辑错误的根本办法;避免将无限回路隐藏在更高的阈值里。- 对于调试长链路或大量重试的场景,合理提高(如 100~500)有助于观察全流程。
执行结果示例:
输出示例(成功路径):
推理引擎构建完成
=== 流式输出演示 ===
Step 1 function
流式结果: {'step_1': {'step': 'step 1', 'status': ''}}
Step 2 function
流式结果: {'step_2': {'step': 'step 2', 'status': ''}}
Step 3 function
流式结果: {'step_3': {'step': 'step 3', 'status': 'success'}}

=== 同步调用对比 ===
Step 1 function
Step 2 function
Step 3 function
最终结果: {'step': 'step 3', 'status': 'success'}
输出示例(失败重试路径):
推理引擎构建完成
=== 流式输出演示 ===
Step 1 function
流式结果: {'step_1': {'step': 'step 1', 'status': ''}}
Step 2 function
Step 2 function failed
流式结果: {'step_2': {'step': 'step 2', 'status': 'failed'}}
Step 1 function
流式结果: {'step_1': {'step': 'step 1', 'status': ''}}
Step 2 function
Step 2 function failed
流式结果: {'step_2': {'step': 'step 2', 'status': 'failed'}}
Step 1 function
流式结果: {'step_1': {'step': 'step 1', 'status': ''}}
Step 2 function
Step 3 function
流式结果: {'step_3': {'step': 'step 3', 'status': 'success'}}

=== 同步调用对比 ===
最终结果: {'step': 'step 3', 'status': 'success'}
总结
LangGraph为构建复杂的推理引擎提供了强大的抽象能力。通过状态、节点、边和条件判断的组合,我们可以轻松实现各种复杂的业务流程。这种基于图的计算模型不仅直观易懂,而且具有很强的可扩展性和可维护性。
在实际应用中,你可以根据具体需求调整状态结构、节点逻辑和条件判断,构建出适合自己业务场景的推理引擎。